What is the Pro Picnic Move? Onigiri. Onigiri: Here’s how to make it.
Aaron Israel and Sawako Okochi have a more attractive vision. The Brooklyn restaurant Shalom Japan’s owners, Gabriella Gershenson and Sawako Okochi, have included a recipe in their new cookbook, “Love Japan (Ten Speed),” that pays homage to the Japanese spring picnic.
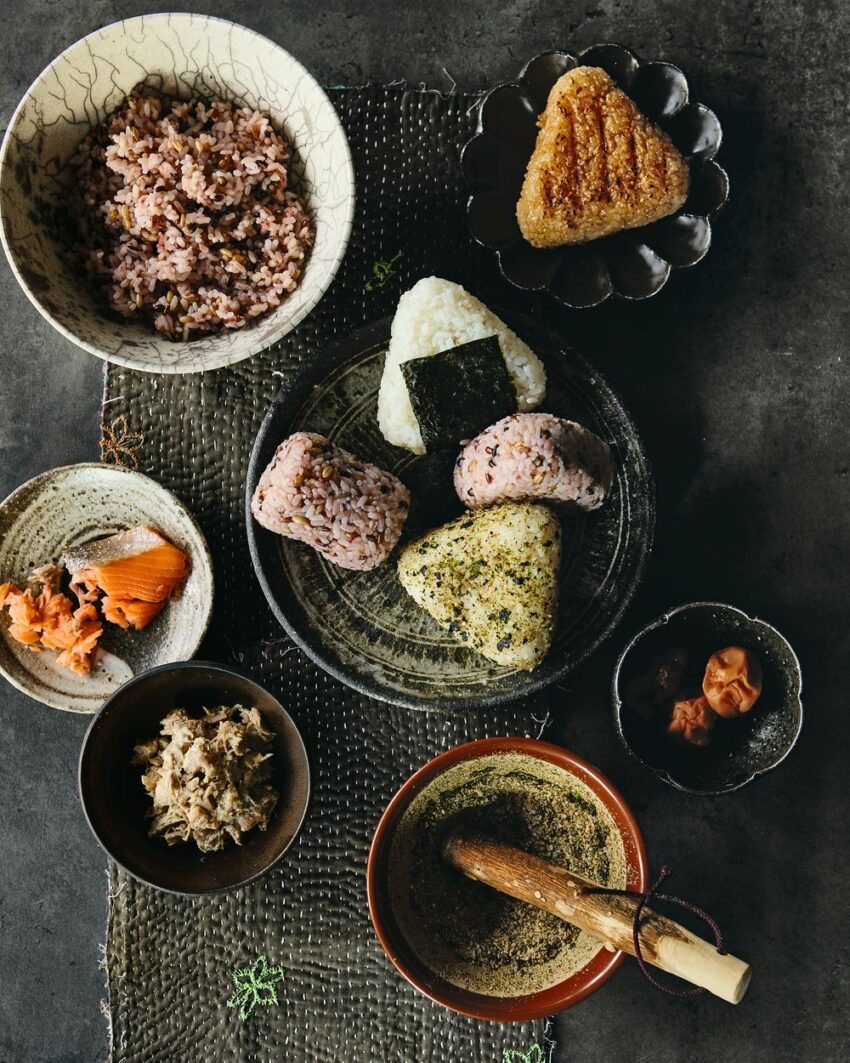
After a long, cold winter in Japan, people are eager to spend time outside under the cherry trees, said Ms. Okochi. The Okochi Israel family picnics are a feast for all seasons, from tamagoyaki to cheeses and charcuterie. Onigiri is the MVP snack. Onigiri, which are tender seasoned riceballs stuffed with any fillings or left plain, is the ultimate portable treat. The verb nigiri means to grasp.
Israel said that they are a low-effort and high-reward picnic snack. He explained: “There is the practical aspect, which is onigiri can be kept at room temperature for many hours.” It’s not just the taste you enjoy when someone makes it for you. Bite in, and you find this hidden treasure–like a whole meal in your hand.”To achieve the proper stickiness and texture–a tender quality known as forward–Japanese-style short-grain rice is a must. Are you feeling virtuous? Switch to a multigrain black-rice mix. Remember to season your food, whether it is with plain salt or furikake – an umami-packed mix of sesame, dried seaweeds, fish flakes, herbs, and salt.
To hold their signature silhouettes–traditionally round, triangular, or a barrel shape called a tawara–Onigiri should be formed with damp hands while the rice is hot. Want to use leftovers? If you want to use leftover rice, first microwave or steam it. You can find inexpensive molds online or at Asian markets. But you don’t need any unique gadgets. When making Onigiri, Ms. Okochi only uses her hands, a small dish, and a piece of plastic wrap.
You can use Japanese classics such as umeboshi, pickled plums, or broiled salmon, or you can follow the contents of Tupperware. You can use anything you like, as long as the mixture isn’t too wet, said Ms. Okochi. She made this batch last year using leftover turkey, umeboshi, and cranberry as a substitute.
Wrap your Onigiri tightly in plastic wrap once they are ready for picnics to avoid drying out. Ms. Okochi, and Mr. Israel, often bring a sheath or crispy nori sheets to wrap the rice parcels before eating. It adds a great texture and flavor, preventing your hands from sticking to the rice,” said Mr. Israel. As with all onigiri options, this is just one. “All roads lead to happiness.”
How to shape Onigiri
The satisfaction of forming these rice balls is almost equal to eating them. You can find the complete recipe below. Start by adding rice to a small dish lined with plastic wrap. Now comes the fun. The key steps are illustrated below:
Ingredients
- 6 cups of cooked white or multigrain short-grain rice, served very warm
- Filling: 4 ounces (such as salted salmon, broiled salmon, tuna mayo, or umeboshi).
- Use Kosher Salt for Seasoning
- Furikake (optional).
- Cut into strips, optionally.
Directions
-
- To prevent the rice from sticking, prepare a small bowl with water and wet your cup measure or utensils.
- Start with a small metal or plastic bowl about 4 inches in diameter and 1 cup. Ceramics is not recommended because the plastic wrap will stick to it. Line the container with a piece of square plastic wrap. Leave a few inches over the sides.
- Fill up a half-cup measuring cup with cooked rice. Sprinkle with salt or furikake and flip the bowl, season-side-down, into the plastic-wrapped liner. Make a slight indentation in the rice with a spoon or rice paddle the size of your thumb.
- Place approximately one tablespoon of filling in the indentation and gently push it in. Use a little less umeboshi if you are using it.
- Pour another 1/4 cup of cooked rice and press it down to seal the filling. Sprinkle a little salt on top.
- Remove the onigiri bowl and place plastic over the rice.
- Use your dominant hand to make the corner of a triangle while the other hand forms the side. Then, turn the rice ball twice in your hands to make the Onigiri have three sides and three corners. To finish the shape, lightly flatten the middle of the triangle.
- To make a barrel, first form the rice into a cylindrical shape. Then gently flatten the top and bottom. Making a ball is easy, but press just a little.
- Repeat until you get eight onigiris. Furikake can be added to the exterior if desired. To keep them fresh, tightly wrap the furikake. If expected, open and wrap nori strips around the Onigiri before eating. The best way to enjoy Onigiri is at room temperature, the same day they are made.

Leave a Reply